2.1. Molecular Morphing Basics
This section showcases the most basic features and building blocks needed to successfully start modifying compounds in an automated fashion and, thus, initiate a chemical space journey. Not all of the features and settings of the presented data structures will be discussed here so we encourage the interested reader to study the Source Code Documentation where all library features are described in full.
The Python examples in this tutorial are taken from a sample Jupyter Notebook which
can be downloaded here. A rendered HTML version
with all calculation results can be viewed here.
If you run into an issue with the examples or have an idea or suggestion, consider submitting to the issue tracker.
2.1.1. Molecules and Morphing Operators
At the core of molecular morphing are so called chemical operators (or morphing operators). These are elemental structural modifications by which one can move from a given molecular structure to another. Therefore, these operators give us an opportunity to ‘propel’ our chemical spaceship in a certain direction [1]. Molpher-lib currently implements the same 8 chemical operators featured in Molpher (Fig. 2.1). Those should be sufficient to create any chemical structure even if we just specify a single atom as input.
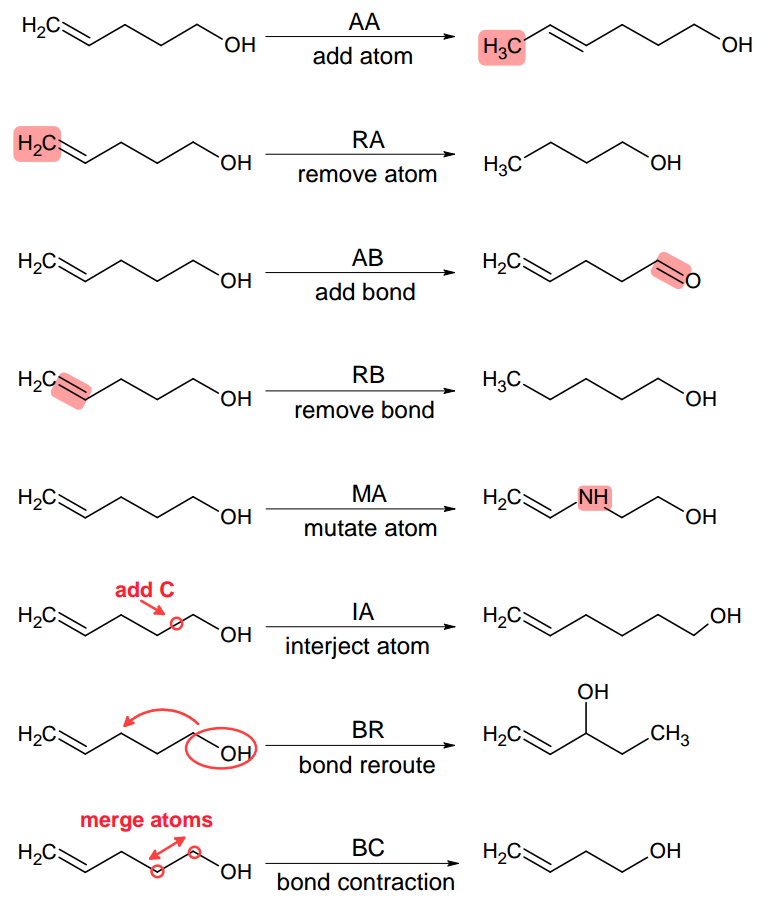
Fig. 2.1 Morphing operators implemented in Molpher-lib by default. They are used to generate new structures from existing ones. Adapted from [2].
However, it should be noted that there is no reason why one should use exactly these 8 operators since they were chosen more or less arbitrarily during Molpher development. Luckily, Molpher-lib enables anyone to define their own operators in addition to these as we will show later.
Let’s now use the Molpher-lib library to write a simple program which will use a chemical operator to manipulate the structure of captopril, an important stepping stone hypertension treatment.
In order to proceed, we first need to initialize a MolpherMol instance:
1 2 3 4 | import molpher
from molpher.core import MolpherMol
mol = MolpherMol("O=C(O)[C@H]1N(C(=O)[C@H](C)CS)CCC1")
|
Therefore, we import the molpher package first. This is the main module of Molpher-lib.
Then we import the MolpherMol class from molpher.core, which is the package
housing the main chemical space exploration capabilities and is the one we will be
working with most of the time. MolpherMol instances have many attributes
and methods. One of the attributes we can access is the SMILES string associated
with the instance:
print(mol.smiles)
Output:
CC(CS)C(=O)N1CCCC1C(=O)O
As you can see, Molpher-lib discards stereochemistry from molecules. Since we are still quite early in the development, this is only for the sake of simplicity. Therefore, when working with compounds generated by the library one needs to take into account all possible isomers because they are not seen as distinct chemical species by the library, at least not just yet. However, we are planning to expand in this area.
Since Molpher-lib is working with RDKit behind the scenes, it is quite
straightforward to convert between Molpher-lib molecules and RDKit molecules.
All we need to do is just call the asRDMol method on our MolpherMol instance:
rd_mol = mol.asRDMol()
print(rd_mol)
Output:
<rdkit.Chem.rdchem.Mol object at 0x7f177c4bb940>
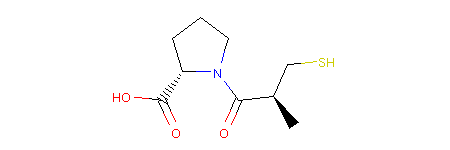
We can then use the RDKit representation to draw a 2D picture of our molecule. In a Jupyter Notebook we would achieve that like so:
1 2 3 4 5 | from rdkit.Chem.Draw import IPythonConsole
IPythonConsole.ipython_useSVG = False
from rdkit.Chem.Draw.MolDrawing import MolDrawing
mol.asRDMol() # embed the resulting molecule into the notebook as a PNG image
|
Output:
Note
You can see that stereochemistry is maintained in the picture. Molpher-lib remembers it from the input, but has no ability to work with it, yet. Therefore, all isomers are equal, but will remember the input configuration of all atoms even after modification as we will see next.
Let’s now mobilize one of the chemical operators to generate new possible structures
that we could assemble from this set of atoms without changing their valency.
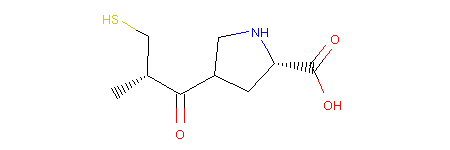
This operator is called RerouteBond and can be used as follows:
1 2 3 4 5 6 | from molpher.core.morphing.operators import RerouteBond
rrbond = RerouteBond()
rrbond.setOriginal(mol)
morph = rrbond.morph()
morph.asRDMol()
|
Output:
Note
All basic morphing capabilities are housed under the molpher.core.morphing
package while chemical space exploration features (featured in the
follow-up tutorial) are located directly under molpher.core.
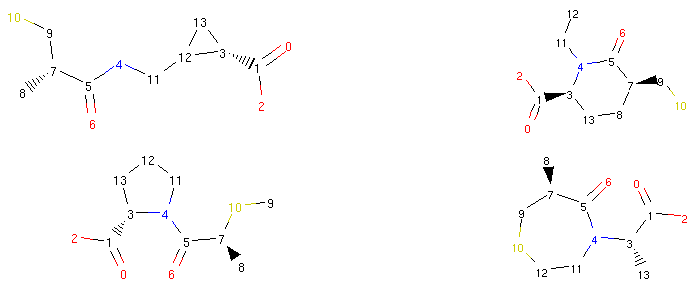
We can see what happened more clearly if we view the structures of the original captopril and its morph side by side and with atom indices present:
1 2 3 4 5 | from rdkit.Chem.Draw.MolDrawing import DrawingOptions
DrawingOptions.includeAtomNumbers=True
rrbond.getOriginal().asRDMol()
morph.asRDMol()
|
Output:

The operator disconnected the bond between atoms 4 and 5 and created a new bond between atoms 5 and 12. Therefore, the bond coming from atom 5 to atom 4 was ‘rerouted’ to ‘point’ to atom 12.
There are obviously many possible reroutes for an average compound. The operator first observes
the possibilities when the setOriginal()
method is called and then randomly selects one option
when the user requests a morph with the morph()
method. Therefore, we could make a call to the morph method many times and each time
we would get a different possible reroute:
1 2 3 4 | rrbond.morph().asRDMol()
rrbond.morph().asRDMol()
rrbond.morph().asRDMol()
rrbond.morph().asRDMol()
|
Output:
From a synthetic viewpoint, many of the structures generated like this might not be stable or synthetically viable. Therefore, generating new possible drugs like this is quite a crude approach, but as we will show in the next parts of our tutorial, Molpher-lib has features that can help us prioritize more viable structures over others.
Note
The setOriginal() and
morph() methods are part of an
interface defined by the MorphingOperator abstract class.
By implementing the methods of this class, the user can create their own operators and easily
plug them into the Molpher-lib ecosystem. We will show an example of this
in the next tutorial on more advanced topics.
| [1] | This means of ‘chemical space travel’ is not entirely new and a similar program (SPACESHIP) had been developed in the past. |
| [2] | Hoksza D., Škoda P., Voršilák M., Svozil D. (2014) Molpher: a software framework for systematic chemical space exploration. J Cheminform. 6:7. DOI |
2.1.2. Creating Morphs in Bulk
In the previous section, we outlined how chemical operators work
using a very simple example and aside from RerouteBond
we did not really explore the full
range of possibilities available to us.
In this section, we will make up for that and show how to
use Molpher-lib to easily generate thousands of new compounds
from a single molecule.
The Molpher class serves this purpose. It aggregates
morphing operators and randomly applies them to the specified compound structure.
For example, we can use it to generate various structures
derived from captopril that have some atoms replaced, removed or added like so:
1 2 3 4 5 6 7 8 9 10 11 12 13 14 15 16 17 18 | from molpher.core.morphing import Molpher
from molpher.core.morphing.operators import AddAtom, RemoveAtom, MutateAtom
molpher = Molpher(
mol
, [
AddAtom()
, RemoveAtom()
, MutateAtom()
]
)
molpher()
morphs = molpher.morphs
print(len(morphs))
print(morphs[1:3])
print(molpher.morphs)
|
Output:
27
(<molpher.core.MolpherMol.MolpherMol at 0x7f924d8a9210>, <molpher.core.MolpherMol.MolpherMol at 0x7f924d8a96c0>)
()
In the first step, we created a Molpher instance by specifying the molecule
to be modified in the first argument of its constructor and the operators to use
as a Python list in the second. Molpher instances are callable
and we need to call them in
order to generate morphs. The generated morphs are then available by
reading the morphs property of our Molpher instance.
We managed to generate 27 morphs in this case. By default, Molpher
tries to generate 30 compounds, but it will ignore those that failed to
generate. This can be caused by internal errors
that should be showed in the error output,
but also simply because certain operators cannot be applied to
the molecule in question. For example, if there is no ring in the
molecule and the RemoveBond operator is chosen,
no molecules are generated because this operator fails if
its application results in a disconnected structure.
As you can also see in the example, reading the morphs property automatically
empties it. This helps to save memory by transferring ownership to
the caller when they retrieve generated structures.
The molpher() call, on the other hand, does not reset the instance
so you can pile up morphs by subsequent molpher() calls
before retrieving them from morphs. However, a more
efficient method would be to give Molpher
a high enough number of morphing attempts from the very beginning:
1 2 3 4 5 6 7 8 9 | molpher = Molpher(
mol
, [
AddAtom()
, RemoveAtom()
, MutateAtom()
]
, attempts = 100
)
|
This approach is preferable since the subsequent molpher()
call is able to distribute the calculation among all CPU cores
available on the system. You can change this behaviour by passing
the threads parameter to the constructor:
1 2 3 4 5 6 7 8 9 10 | molpher = Molpher(
mol
, [
AddAtom()
, RemoveAtom()
, MutateAtom()
]
, attempts = 100
, threads = 2
)
|
This will ensure that no more than 2 cores are used for the calculation.
Thanks to the RDKit integration, we can take a look at some of the compounds we generated previously:
1 2 3 4 5 6 7 8 9 | from rdkit.Chem.Draw import MolsToGridImage
def show_mol_grid(mols):
return MolsToGridImage(
[x.asRDMol() for x in mols]
, subImgSize=(250,200)
)
show_mol_grid(morphs)
|
Part of the output:
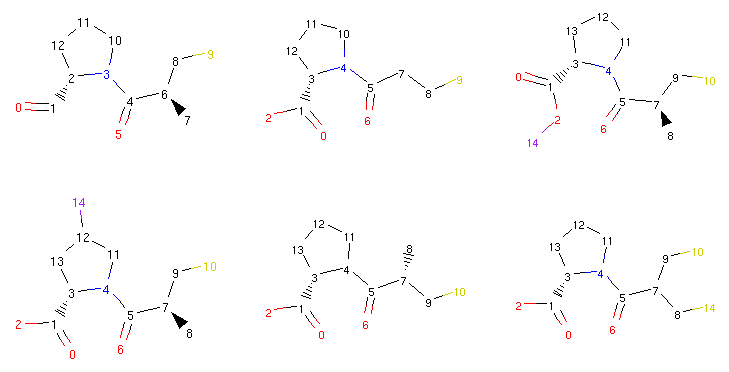
The Molpher class or the operators themselves
do not perform any advanced ‘chemical sanity’ checks so sometimes one
can run into molecules that make little sense (such as the
one in the upper right corner with a halogen atom attached directly
to oxygen) [3]. So while Molpher-lib should be sensible enough not to generate compounds with
a 5-valent carbon atom and such, you still should put in place some common
sense filters that can be specific to your use case, but also general rules
such as removing compounds that are too large or too complex. Additionally, neither the operators
nor Molpher are able to tell if a compound has already been
generated. Morphing operations are completely independent and
the result is always determined by a random selection from
all possible modifications permitted by the operators and the original compound.
Thus, it is also up to the caller to check for duplicate compounds.
We will now try to tackle these shortcoming
by implementing a collector. A collector is a simple callback function
which takes two arguments, the generated morph and the operator used to create it,
but has no return value. We can supply a Molpher
instance with a collector like so:
1 2 3 4 5 6 7 8 9 10 11 12 13 14 15 16 17 18 19 20 21 22 23 24 | from rdkit import Chem
strange_patterns = Chem.MolFromSmarts('[S,O,N][F,Cl,Br,I]')
sensible_morphs = dict()
def collect_sensible(morph, operator):
rd_morph = morph.asRDMol()
if not rd_morph.HasSubstructMatch(strange_patterns):
sensible_morphs[morph.smiles] = morph
molpher = Molpher(
mol
, [
AddAtom()
, RemoveAtom()
, MutateAtom()
]
, attempts = 100
, collectors = [collect_sensible]
)
molpher()
print(len(molpher.morphs))
print(len(sensible_morphs))
|
Output:
90
49
Therefore, in this example we generated 90 morphs, but only selected 49 that were unique and satisfied our requirements (no halogens in the immediate neighborhood of sulfur, oxygen or nitrogen). If we wanted to, we could then use these 49 structures to seed more calculations that could help us learn more about how the strucural changes could affect pharmacokinetic and pharmacodynamic properties.
| [3] | This actually can have its purpose as demonstrated in: Voršilák, M. and Svozil, D. (2017). Nonpher: computational method for design of hard-to-synthesize structures. Journal of Cheminformatics. 9. DOI:10.1186/s13321-017-0206-2 |
2.1.3. Substructure locking
In some cases, we might want to maintain a certain substructure in all of our morphs. Therefore, Molpher-lib has features that will allow us to lock certain atoms and prevent some structural changes from occurring. One way to do that is to initialize a molecule from an SDF file which includes atom locking specification (Listing 2.2).
1 2 3 4 5 6 7 8 9 10 11 12 13 14 15 16 17 18 19 20 21 22 23 24 25 26 27 28 29 30 31 32 33 34 35 36 37 38 39 40 41 42 43 44 45 46 47 48 49 50 51 52 53 54 55 56 57 58 59 60 61 62 63 64 65 66 67 68 69 70 71 72 73 | 44093
-OEChem-04191807522D
29 29 0 1 0 0 0 0 0999 V2000
2.0000 -1.9594 0.0000 S 0 0 0 0 0 0 0 0 0 0 0 0
4.5981 -0.4594 0.0000 O 0 0 0 0 0 0 0 0 0 0 0 0
6.2353 1.9885 0.0000 O 0 0 0 0 0 0 0 0 0 0 0 0
5.7000 0.3412 0.0000 O 0 0 0 0 0 0 0 0 0 0 0 0
3.7320 1.0406 0.0000 N 0 0 0 0 0 0 0 0 0 0 0 0
4.5411 1.6284 0.0000 C 0 0 1 0 0 0 0 0 0 0 0 0
4.2320 2.5794 0.0000 C 0 0 0 0 0 0 0 0 0 0 0 0
3.2320 2.5794 0.0000 C 0 0 0 0 0 0 0 0 0 0 0 0
2.9230 1.6284 0.0000 C 0 0 0 0 0 0 0 0 0 0 0 0
3.7320 0.0406 0.0000 C 0 0 0 0 0 0 0 0 0 0 0 0
2.8660 -0.4594 0.0000 C 0 0 1 0 0 0 0 0 0 0 0 0
5.4921 1.3194 0.0000 C 0 0 0 0 0 0 0 0 0 0 0 0
2.8660 -1.4594 0.0000 C 0 0 0 0 0 0 0 0 0 0 0 0
2.0000 0.0406 0.0000 C 0 0 0 0 0 0 0 0 0 0 0 0
4.6381 1.0160 0.0000 H 0 0 0 0 0 0 0 0 0 0 0 0
4.8385 2.7083 0.0000 H 0 0 0 0 0 0 0 0 0 0 0 0
4.1672 3.1960 0.0000 H 0 0 0 0 0 0 0 0 0 0 0 0
3.2969 3.1960 0.0000 H 0 0 0 0 0 0 0 0 0 0 0 0
2.6256 2.7083 0.0000 H 0 0 0 0 0 0 0 0 0 0 0 0
2.3566 1.8805 0.0000 H 0 0 0 0 0 0 0 0 0 0 0 0
2.6130 1.0914 0.0000 H 0 0 0 0 0 0 0 0 0 0 0 0
2.8660 0.1606 0.0000 H 0 0 0 0 0 0 0 0 0 0 0 0
3.0781 -2.0420 0.0000 H 0 0 0 0 0 0 0 0 0 0 0 0
3.4766 -1.3518 0.0000 H 0 0 0 0 0 0 0 0 0 0 0 0
2.3100 0.5775 0.0000 H 0 0 0 0 0 0 0 0 0 0 0 0
1.4631 0.3506 0.0000 H 0 0 0 0 0 0 0 0 0 0 0 0
1.6900 -0.4964 0.0000 H 0 0 0 0 0 0 0 0 0 0 0 0
6.8249 1.7969 0.0000 H 0 0 0 0 0 0 0 0 0 0 0 0
2.0000 -2.5794 0.0000 H 0 0 0 0 0 0 0 0 0 0 0 0
1 13 1 0 0 0 0
1 29 1 0 0 0 0
2 10 2 0 0 0 0
3 12 1 0 0 0 0
3 28 1 0 0 0 0
4 12 2 0 0 0 0
5 6 1 0 0 0 0
5 9 1 0 0 0 0
5 10 1 0 0 0 0
6 7 1 0 0 0 0
6 12 1 1 0 0 0
6 15 1 0 0 0 0
7 8 1 0 0 0 0
7 16 1 0 0 0 0
7 17 1 0 0 0 0
8 9 1 0 0 0 0
8 18 1 0 0 0 0
8 19 1 0 0 0 0
9 20 1 0 0 0 0
9 21 1 0 0 0 0
10 11 1 0 0 0 0
11 13 1 0 0 0 0
11 14 1 1 0 0 0
11 22 1 0 0 0 0
13 23 1 0 0 0 0
13 24 1 0 0 0 0
14 25 1 0 0 0 0
14 26 1 0 0 0 0
14 27 1 0 0 0 0
M END
> <MOLPHER_KEEP_NEIGHBORS_AND_BONDS>
2,3,4,5,6,7,8,9,10,12
> <MOLPHER_NO_MUTATION>
2,3,4,5,6,7,8,9,10,12
> <MOLPHER_NO_ADDITION>
2,3,4,5,6,7,8,9,10,12
$$$$
|
Every atom of a MolpherMol instance has
a so called ‘locking mask’ attached to it. This mask
specifies what type of restrictions are imposed on an
atom and when morphing operators are applied this
information can be retrieved and used to prevent
changes that would violate the applied locks.
In Listing 2.2, we see examples of 3 atom locks:
KEEP_NEIGHBORS_AND_BONDS– Prevents the neighbors of this atom and the bonds connecting them from being removed.NO_MUTATION– Atoms marked with this lock cannot be mutated (changed for another element)NO_ADDITION– No more atoms will be added to this atom.
See also
We can also use the lockAtoms method of MolpherMol. This method
can take a SMARTS pattern and will lock all substructures corresponding to that particular pattern.
malonic_acid = MolpherMol("OC(=O)CC(=O)O")
malonic_acid.lockAtoms("OC(=O)", MolpherAtom.NO_ADDITION | MolpherAtom.NO_MUTATION)
It returns the indices of the locked atoms:
(0, 1, 2, 6, 4, 5)
Let us now create a new molecule from the SDF in Listing 2.2:
mol = MolpherMol("captopril.sdf")
If we pass a string that ends with “.sdf”, Molpher-lib will automatically recognize it as a path to an SDF file and will attempt to load the first molecule from that file and parse any locks that it finds in it.
Every atom under a MolpherMol instance
is represented by the MolpherAtom class.
This class, among other things, provides access to the locks placed
on each atom of the molecule in question. We can retrieve the locking
information like so:
1 2 3 | for idx, atm in enumerate(mol.atoms):
print(idx)
print(atm.lock_info)
|
Output for first five atoms:
0
{'UNLOCKED': True, 'NO_MUTATION': False, 'NO_ADDITION': False, 'NO_REMOVAL': False, 'KEEP_NEIGHBORS': False, 'KEEP_NEIGHBORS_AND_BONDS': False, 'KEEP_BONDS': False, 'FULL_LOCK': False}
1
{'UNLOCKED': False, 'NO_MUTATION': True, 'NO_ADDITION': True, 'NO_REMOVAL': True, 'KEEP_NEIGHBORS': True, 'KEEP_NEIGHBORS_AND_BONDS': True, 'KEEP_BONDS': True, 'FULL_LOCK': True}
2
{'UNLOCKED': False, 'NO_MUTATION': True, 'NO_ADDITION': True, 'NO_REMOVAL': True, 'KEEP_NEIGHBORS': True, 'KEEP_NEIGHBORS_AND_BONDS': True, 'KEEP_BONDS': True, 'FULL_LOCK': True}
3
{'UNLOCKED': False, 'NO_MUTATION': True, 'NO_ADDITION': True, 'NO_REMOVAL': True, 'KEEP_NEIGHBORS': True, 'KEEP_NEIGHBORS_AND_BONDS': True, 'KEEP_BONDS': True, 'FULL_LOCK': True}
4
{'UNLOCKED': False, 'NO_MUTATION': True, 'NO_ADDITION': True, 'NO_REMOVAL': True, 'KEEP_NEIGHBORS': True, 'KEEP_NEIGHBORS_AND_BONDS': True, 'KEEP_BONDS': True, 'FULL_LOCK': True}
5
{'UNLOCKED': False, 'NO_MUTATION': True, 'NO_ADDITION': True, 'NO_REMOVAL': True, 'KEEP_NEIGHBORS': True, 'KEEP_NEIGHBORS_AND_BONDS': True, 'KEEP_BONDS': True, 'FULL_LOCK': True}
The lock_info attribute of MolpherAtom
summarizes the locking status in a dictionary which we can
query to see if an atom is unlocked and what type of locks
are in place.
In the example Jupyter Notebook, we used the following code to highlight locked atoms:
1 2 3 4 5 6 7 8 9 10 11 12 13 14 15 16 17 18 19 20 21 22 23 24 25 | from rdkit.Chem.Draw import rdMolDraw2D
from IPython.display import SVG
def get_locked_ids(mol):
return [idx for idx, atm in enumerate(mol.atoms) if atm.is_locked]
def show_locked_atoms(mol):
rd_mol = mol.asRDMol()
drawer = rdMolDraw2D.MolDraw2DSVG(300, 300)
# include atom indices
opts = drawer.drawOptions()
for i in range(rd_mol.GetNumAtoms()):
opts.atomLabels[i] = str(i+1)
# draw the molecule as SVG
drawer.DrawMolecule(
rd_mol
, highlightAtoms=get_locked_ids(mol)
)
drawer.FinishDrawing()
return SVG(drawer.GetDrawingText().replace('svg:',''))
show_locked_atoms(mol)
|
Output:
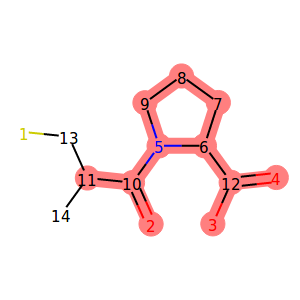
We used the is_locked attribute of the MolpherAtom
class to first find out the indices of locked atoms.
We then used that information to instruct the
RDKit drawing code to highlight the given positions.
You might have noticed that atom number 11 is displayed
as locked, but we did not specify any locks for it
in our SDF. This is because the neighboring carbon atom (number 10)
has the KEEP_NEIGHBORS lock which implies NO_REMOVAL
and NO_MUTATION locks on all neighbors including carbon number 11.
We can check that exactly these two locks are in place on this atom using
the locking_mask attribute:
1 2 3 | from molpher.core import MolpherAtom
mol.atoms[10].locking_mask == (MolpherAtom.NO_REMOVAL | MolpherAtom.NO_MUTATION)
|
Output:
True
This is possible because the value of the locking mask attribute is the combination of used locks. We can also use the attribute to set a new locking mask on an atom like so:
mol.atoms[10].locking_mask = MolpherAtom.NO_REMOVAL
This will only prevent this atom from being removed, but will make it possible to replace it for another one that will satisfy the bonding requirements placed by the neighbors.
Locked molecules can then be normally used for morphing and the operators should ensure that the generated molecules are respecting these locks. We can check that in our captopril example by running the morphing code written in the previous section. However, this time we will use all available morphing operators:
1 2 3 4 5 6 7 8 9 10 11 12 13 14 15 16 17 18 19 20 21 22 23 24 25 26 27 28 29 30 31 32 33 34 35 36 37 38 39 40 41 42 43 44 45 46 | from rdkit import Chem
from molpher.core.morphing.operators import *
# new grid drawing code, will show atom locks
def show_mol_grid(mols):
locked_atoms = [get_locked_ids(x) for x in mols]
return MolsToGridImage(
[x.asRDMol() for x in mols]
, subImgSize=(300,300)
, highlightAtomLists=locked_atoms
)
# same as before
strange_patterns = Chem.MolFromSmarts('[S,O,N][F,Cl,Br,I]')
sensible_morphs = dict()
def collect_sensible(morph, operator):
"""
simple collector, accepts morphs without weird structural patterns
"""
rd_morph = morph.asRDMol()
if not rd_morph.HasSubstructMatch(strange_patterns):
sensible_morphs[morph.smiles] = morph
# same as before, but with all operators
molpher = Molpher(
mol
, [
AddAtom()
, RemoveAtom()
, MutateAtom()
, AddBond()
, RemoveBond()
, ContractBond()
, InterlayAtom()
, RerouteBond()
]
, attempts = 100
, collectors = [collect_sensible]
)
molpher()
print(len(molpher.morphs))
print(len(sensible_morphs))
show_mol_grid(sensible_morphs.values())
|
Part of the output:
72
28
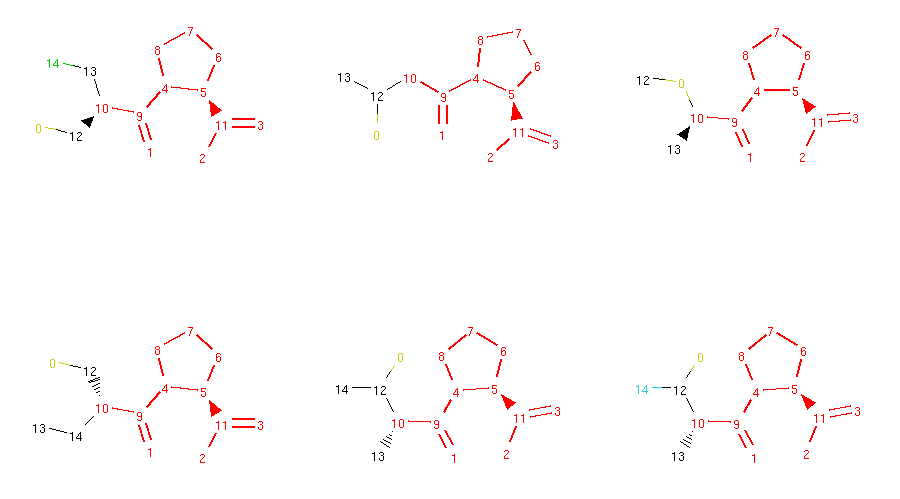
As you can see, the generated molecules preserve the locked substructure and also inherit the locks from their parent molecule. This ensures that the typical structural pattern of this category of antihypertensives is preserved across all generated compounds.
2.1.4. Summary
In this tutorial, we explained the most basic features of Molpher-lib
and hopefully managed to hint at some potentially interesting use
cases. In the next part of the tutorial, we will introduce the ExplorationTree
class which is used to create paths in chemical space.
Note
If you want to see more examples of atom locking and how custom operators work, there
is one more Jupyter Notebook written for this purpose
(download here). This
more in-depth overview also highlights some shortcomings
of the current implementation and outlines future directions for Molpher-lib development.